Installation
Install Docker
For both installations you need to have docker installed. Install docker with root-level privileges. You may have to reboot after installation.
A full Docker installation can be used for testing or developing the framework. A System installation is preferred when integrating the framework on a robot platform.
Docker
Download the file below and unzip.
On linux you can use
wgetcommand to download the file:
wget https://minio.ilvo.be:9000/tv115-ilvo-robotics/artof-docker.zip
On windows and macOS you can use
curlcommand to download the file:
curl -o artof-docker.zip https://minio.ilvo.be:9000/tv115-ilvo-robotics/artof-docker.zip
Unzip the folder and navigate into the folder
ilvo.
On linux and macOS you can use unzip:
unzip artof-docker.zip
cd ilvo
On windows you can right click on the zip file and unzip it.
Open the
data/redis.init.jsonfile and change/d/artof-docker/docker/datato the absolute path of the datafolder in this directory. Note that for windows theD:drive has to be referred to as/d/.
4. Start the containers by executing the docker compose up command. You will see the output of the artof-core and redis-stack-server containers.
The first time, it can take some time for the artof-core to pull and install the system and node-red add-on.
The output of the artof-core will provide information of how the add-ons are launching.
You can check the status of the different containers in docker Docker or using the Docker cli.
Note: When updating to a new version, it is important to clear the redis cache. This can be done by removing the
redis_datavolume or perform theredis-cli FLUSHALLcommand.
The Docker installation is tested on:
Operating System |
Arch |
Docker Version |
|---|---|---|
Ubuntu 22.04 |
x86_64 |
26.0.0, build 2ae903e |
Windows 11 |
x86_64 |
26.0.0, build 2ae903e |
Windows 10 |
x86_64 |
26.0.0, build 2ae903e |
macOS Sonoma 14.2 |
x86_64 |
26.0.0, build 2ae903e |
System
Download and run the script to install the ARTOF dependencies.
wget https://minio.ilvo.be:9000/tv115-ilvo-robotics/install.sh
chmod +x install.sh
./install.sh
The update script can be used for installing the ARTOF binaries for the first time, but also to update to a later or specific version.
For the installation perform the bash commands below and wait until `Done!` appears.
wget https://minio.ilvo.be:9000/tv115-ilvo-robotics/update.sh
chmod +x update.sh
./update.sh
For updating to the latest version perform the bash commands below and wait until `Done!` appears.
./update.sh
The binary installation is currently only supported on Ubuntu 22.04 (arch: x86_64).
The binary installation is tested on:
Operating System |
Arch |
Docker Version |
|---|---|---|
Ubuntu 22.04 |
x86_64 |
26.0.0, build 2ae903e |
Check your installation (Binary and Docker)
Now, you can browse for the first time to the system add-on web page.
For the system installation, browse to http://<ip-robot>.
For the docker installation, browse to http://<ip-robot>:8080.
Next, browse to the Tab Map and toggle the `Sim` button twice. You should see the robot appear as shown in Figure 1.
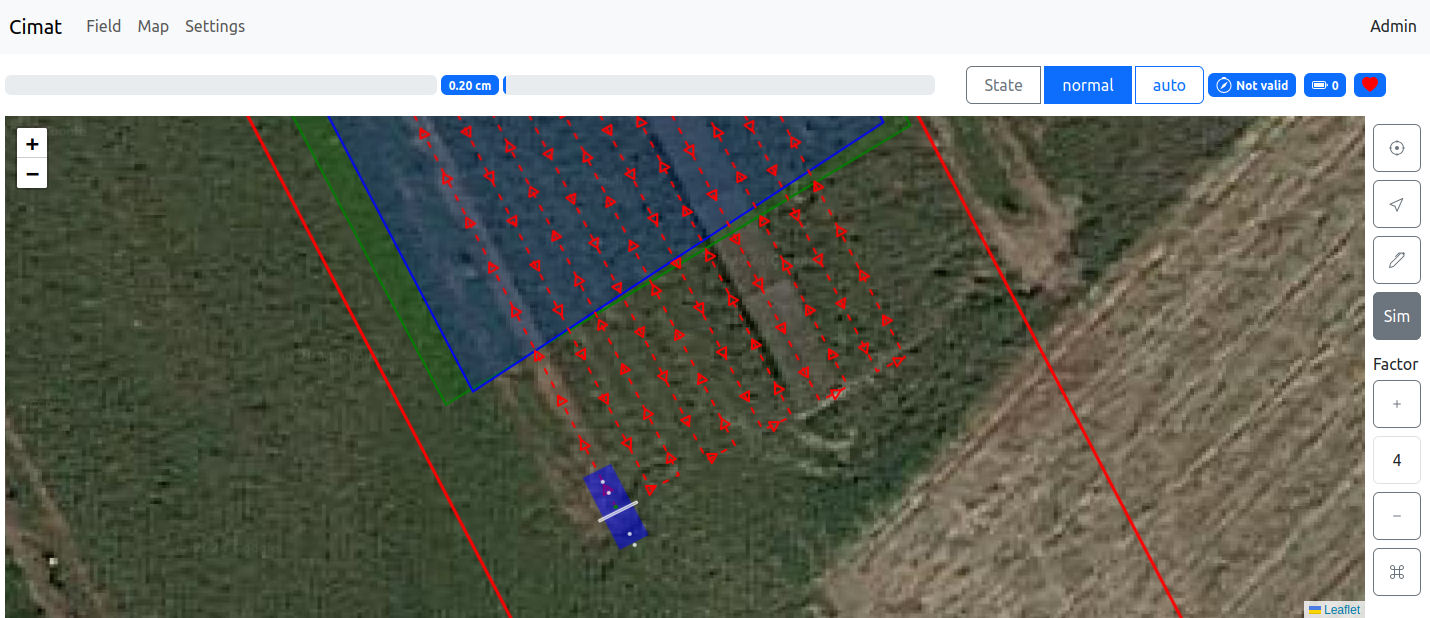
Figure 1. Tab Map: First view of the robot in the system add-on
Thereafter, check the node-red add-on installation at http://<ip-robot>:1880.
Additional hardware configuration
SimpleRTK3b GPS
Connect to USB ethernet (dhcp) and write the ip 192.168.3.1 in your brower.
In tab
`Corrections``Correntions Input`, set`USB1`to`RTCMv3`In tab
`NMEA/SBF Out`add`New NMEA stream`set`USB1`to`GGA+VTG+HDT+HRP`and specify your interval.On your computer you need to add yourself to the dialout group
`sudo usermod -a -G dialout <your-username>`and reboot.Configure automatic hyperlink creation for a
`/dev/ttACMx`to`/dev/septentrio0`. Therefore paste the following in the file`/etc/udev/rules.d/99-septentrio.rules`:
sudo vim /etc/udev/rules.d/99-septentrio.rules
# SEPTENTRIO (names are not loaded in lsusb, use ENV variables of udevadm)
SUBSYSTEM=="tty", ACTION=="add", ENV{ID_VENDOR_ID}=="152a", ENV{ID_MODEL_ID}=="85c0", ENV{ID_USB_INTERFACE_NUM}=="02", SYMLINK+="septentrio0"
SUBSYSTEM=="tty", ACTION=="add", ENV{ID_VENDOR_ID}=="152a", ENV{ID_MODEL_ID}=="85c0", ENV{ID_USB_INTERFACE_NUM}=="04", SYMLINK+="septentrio1"
Enable ssh
To enable ssh execute the following commands:
sudo apt update
sudo apt install openssh-server -y
sudo systemctl status ssh
Remote connection
To access the robot framework remotely, you can configure a VPN connection (e.g. tailscale).
Common issues
Ethernet over USB of the SimpleRTK3b module on a NUC
The Septentrio chip of the SimpleRTK3b GPS modules provides ethernet over USB. This can cause problems on boot time as this USB network device may be selected in favor of the PCI network device. This guide provides a step-by-step approach to create a systemd service file that ensures the specified PCI network device is automatically connected at boot time using nmcli. The provided instructions use systemd, a system and service manager for Linux operating systems, to execute the NetworkManager command line interface (`nmcli`) once the network is online.
Open a Terminal:
`Cntrl-Alt-t`Create Service File: Use a text editor with root permissions to create a new systemd service file. You can use
`nano`or`vim`or any other text editor.
sudo vim /etc/systemd/system/connect-network.service
Add Service Configuration: Copy the following content into the newly created service file. Replace <network device> with the network device identifier you intend to connect.
[Unit]
Description=Connect to a specific network device at boot
After=network-online.target
Wants=network-online.target

[Service]
Type=oneshot
ExecStart=/usr/bin/nmcli dev connect <network device>
RemainAfterExit=yes

[Install]
WantedBy=multi-user.target
Enable and start the service
sudo systemctl enable connect-network.service
sudo systemctl start connect-network.service